
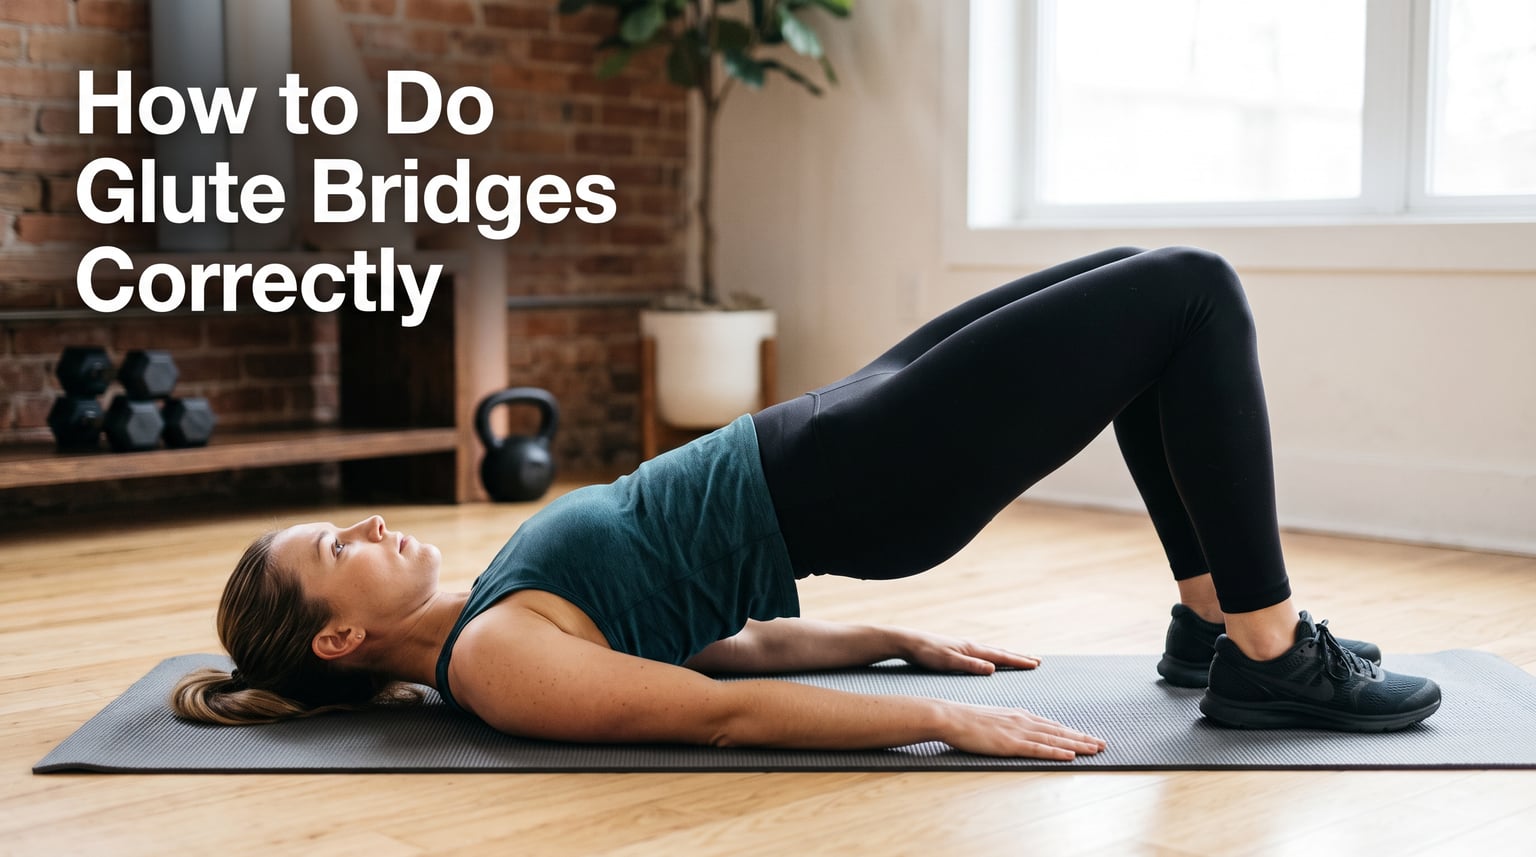
If you’ve been doing glute bridges and feeling them mostly in your hamstrings or lower back instead of your glutes, you’re in good company. This is one of the most common technique problems I see, and it usually comes down to two small things: foot positioning and core engagement.
Understanding how to do glute bridges correctly doesn’t take long, but getting it right makes a real difference — both in how effective the exercise is and in whether it helps or aggravates your lower back. In 2026, this remains one of the most searched exercise form questions for a reason: the movement looks simple but has several spots where it commonly breaks down.
In this guide, I’ll walk you through exact starting position cues, step-by-step instructions designed to target your glutes (not your hamstrings), how to know it’s actually working, and every common mistake worth knowing about.
Table of Contents
What Is a Glute Bridge?
A glute bridge is a bodyweight exercise performed lying on your back with your knees bent and feet flat on the floor. You lift your hips toward the ceiling by squeezing your glutes and pressing through your heels, then lower with control back to the start.
It’s one of the most accessible exercises for glute activation. Unlike squats or deadlifts, it places very little stress on your knees and spine, making it practical for beginners, people dealing with lower back issues, and anyone who needs a reliable warm-up exercise before heavier lower-body training.
The movement targets your posterior chain — primarily the gluteus maximus, hamstrings, and core stabilizers — without any equipment at all. That’s part of why it’s used in rehabilitation settings, general fitness routines, and athletic training programs alike.
How to Do Glute Bridges Correctly
Follow these five steps carefully. Foot placement and core timing are the two areas where technique most commonly falls apart, so pay close attention to those steps.
Step 1: Set Up Your Starting Position
Lie flat on your back on a mat or firm surface. Bend your knees and place your feet flat on the floor, hip-width apart. Your heels should be about 6 to 8 inches away from your glutes — close enough that you could almost reach them with your fingertips if you stretched your arms down toward them.
Rest your arms flat by your sides with your palms facing down. Your head, upper back, and shoulders should stay relaxed on the floor throughout the entire movement.
Step 2: Engage Your Core Before You Lift
Before your hips move at all, tighten your abdominal muscles. Think about gently pressing your lower back toward the floor and drawing your ribs downward. This bracing action has to come before the lift — not during it.
This is the step most people skip entirely, and it’s exactly why lower back pain during glute bridges is so common. Without core engagement first, your lumbar spine absorbs force it shouldn’t have to handle.
Step 3: Drive Through Your Heels and Squeeze Your Glutes
Push through your heels — not the balls of your feet — and simultaneously squeeze your glutes as hard as you can while lifting your hips off the floor. The heel-drive cue is important: it shifts the emphasis toward your glutes rather than letting your hamstrings take over.
Your knees should stay in line with your hips and feet throughout the lift. Don’t let them drift inward or push outward as you rise.
Step 4: Reach Full Hip Extension
Lift your hips until your body forms a straight line from your shoulders to your knees. This is the top of the movement. Hold this position for 1-2 seconds with your glutes fully squeezed and your core still braced.
Don’t push your hips higher than this to squeeze out extra range — that creates an arch in your lower back, which compresses your lumbar spine and actually reduces tension on your glutes. Stop when your shoulder, hip, and knee are in one straight line.
Step 5: Lower With Control
Bring your hips back down toward the floor slowly, taking about 2 seconds on the way down. Don’t completely relax between reps — keep a small amount of tension in your glutes as you lower to maintain the mind-muscle connection throughout the set.
Controlled reps build significantly more muscle and glute awareness than fast, bouncy ones where momentum does most of the work.
What Muscles Does a Glute Bridge Work?
The primary muscle targeted is the gluteus maximus — the largest and most powerful muscle in your body, responsible for hip extension. Every time you push your hips toward the ceiling, your gluteus maximus is the main driver.
Your hamstrings assist in the lift, which is why they can easily overpower your glutes if your technique is off. When your feet are positioned too far from your glutes, the angle puts your hamstrings in a mechanically stronger position and they end up doing most of the work. Moving your heels to 6-8 inches from your glutes is what shifts the load back where it belongs.
The transverse abdominis — your deepest core muscle — engages as a stabilizer to protect your spine throughout the movement. Your gluteus medius, the muscle on the side of your hip, works to keep your knees tracking properly and prevent them from collapsing inward.
As an added benefit, glute bridges gently stretch your hip flexors as you lift. For anyone who spends hours sitting at a desk, this can help counteract the hip flexor tightness that makes both training and daily movement less comfortable.
Signs You’re Doing Glute Bridges Correctly
One thing I hear often from people on fitness forums is that they’ve been doing glute bridges for weeks but can’t tell if they’re actually working. Here’s what correct execution feels like:
- You feel a deep burn or hard squeeze in your glutes at the top of each rep — not primarily in your lower back or the backs of your thighs
- Your hips reach full extension so your shoulders, hips, and knees form one straight line, without your lower back arching
- Your knees stay in line with your feet and don’t collapse inward or flare outward during the movement
- Your lower back is not pressing uncomfortably into the mat and there is no pain or strain in your lumbar area
- After completing a set, your glutes feel genuinely fatigued — not your spinal erectors or the backs of your thighs
If you’re feeling it mostly in your hamstrings, bring your feet 1-2 inches closer to your glutes and focus on the heel-drive cue. If you’re getting lower back pain, pause and re-establish core engagement before the next rep, and make sure you’re not hyperextending at the top.
Common Glute Bridge Mistakes to Avoid
Skipping Core Engagement
This is the number one cause of lower back pain during glute bridges. Your core has to be braced before your hips leave the floor — not partway through the lift. Think of it as a prerequisite: abs tight, ribs down, then lift. Without this, your lumbar spine takes on load it’s not designed to handle in this position.
Feet Positioned Too Far Away
When your heels are too far from your glutes, your hamstrings are in a stronger mechanical position than your glutes and they take over the movement. You end up working your hamstrings while your glutes barely fire. Bring your heels to about 6-8 inches from your glutes and you’ll notice the difference immediately.
Hyperextending the Lower Back at the Top
Pushing your hips up past a neutral straight line creates a sharp arch in your lower back, compresses your lumbar discs, and actually reduces glute activation at the very moment you should be squeezing the hardest. Stop lifting the moment your body reaches a straight line from shoulder to knee.
Letting Your Knees Cave Inward
Knees drifting toward each other during the lift is a sign your gluteus medius and hip abductors aren’t activating properly. Think about pressing your knees outward against imaginary resistance throughout the movement. A light resistance band placed just above your knees can help you feel and fix this pattern.
Rushing Through Reps
Fast, bouncy reps rely on momentum rather than muscle activation. You can get through 20 reps quickly and barely work your glutes at all. Slow the lowering phase to 2 seconds and pause at the top to feel a genuine hard squeeze on every rep. Quality over quantity matters far more with this exercise than with most others.
Glute Bridge Variations to Progress With
Once the standard glute bridge feels solid and you can consistently feel it in your glutes, these variations add progressive challenge.
Single-Leg Glute Bridge
Lift one leg off the floor, extend it straight, and perform the bridge movement on a single foot. This is significantly harder than it sounds. The unilateral demand makes it nearly impossible to compensate with your hamstrings, which is actually a useful feature — it forces you to develop genuine glute strength on each side independently. Start with your arms flat on the floor for stability.
Weighted Glute Bridge
Place a barbell or heavy dumbbell across your hips — fold a thick towel underneath it for comfort — and perform the movement with added resistance. This is where the glute bridge becomes a meaningful strength-building exercise that can contribute to visible muscle growth over time.
Elevated Glute Bridge
Rest your upper back on a bench or elevated surface instead of the floor, and perform the movement from there. This increases the range of motion, giving your glutes a deeper stretch at the bottom and a stronger contraction at the top. This is closely related to the hip thrust and is a natural bridge between the two exercises.
Banded Glute Bridge
Loop a resistance band just above your knees and perform standard glute bridges against the band’s outward pull. This forces your gluteus medius to work throughout the entire movement and immediately fixes knee-cave issues. It’s also a great warm-up option before squats or deadlifts.
Glute Bridge vs Hip Thrust: What’s the Difference?
The glute bridge is performed entirely on the floor. The hip thrust places your upper back on a bench, which increases the range of motion and allows you to comfortably load much heavier weight using a barbell.
Both exercises target the same muscles, but hip thrusts are generally more effective for building glute size and strength over time because of the longer range of motion and greater loading potential. Research on glute activation supports heavier, loaded hip extension movements for hypertrophy.
Glute bridges are the right starting point for beginners, people without a bench or barbell, and as a warm-up activation exercise before lower-body training. When you’ve built a solid foundation with glute bridges and want to keep progressing, the hip thrust is the natural next move.
How Many Glute Bridges Should You Do?
For beginners and glute activation purposes: 2-3 sets of 15-20 reps using bodyweight, performed 3-4 times per week. At this stage, the priority is learning to feel your glutes activate rather than accumulating volume.
For building strength and muscle: 3-4 sets of 8-12 reps with added resistance (barbell, heavy dumbbells, or resistance band), 2-3 times per week. Allow at least 48 hours between sessions to give your muscles time to recover and adapt.
For rehabilitation or lower back pain relief: Start with 2 sets of 10 slow, controlled reps, focusing entirely on proper form and glute awareness. Progress gradually — your goal is to build the mind-muscle connection and strengthen the posterior chain safely, not to accumulate reps quickly.
If you’re using glute bridges as a warm-up activation exercise before squats, deadlifts, or hip thrusts, 1-2 sets of 10-15 reps is enough to prime your glutes without fatiguing them before the main workout.
Frequently Asked Questions
How do you know if you’re doing glute bridges correctly?
You’re doing them correctly if you feel a deep burn or squeeze in your glutes at the top of each rep — not primarily in your lower back or hamstrings. Your hips should reach full extension (a straight line from shoulder to knee) without your lower back arching. After a set, your glutes should feel genuinely fatigued, not your spinal erectors or the backs of your thighs.
What is a common mistake for a glute bridge?
The most common mistake is skipping core engagement before lifting your hips, which leads to lower back pain during the movement. The second most frequent issue is positioning your feet too far from your glutes, which shifts the work onto your hamstrings instead of your glutes. Bringing your heels to about 6-8 inches from your glutes and bracing your core first fixes both problems.
Do glute bridges actually grow glutes?
Yes, glute bridges can contribute to glute growth, especially for beginners who are building their base. Bodyweight bridges are better for activation, endurance, and learning proper form than for significant hypertrophy on their own. Adding resistance — a barbell, heavy dumbbell, or resistance band — significantly increases their effectiveness for building glute size and strength.
Should you feel glute bridges in your thighs?
You should not feel glute bridges primarily in your thighs. If you’re feeling it in your hamstrings (the backs of your thighs), your feet are most likely positioned too far from your glutes — move your heels 1-2 inches closer and focus on pressing through your heels rather than the balls of your feet. A small amount of hamstring engagement is normal, but the dominant sensation should be a hard squeeze in your glutes.
Final Thoughts
Getting how to do glute bridges correctly comes down to three non-negotiable fundamentals: heels positioned 6-8 inches from your glutes, core braced before your hips leave the floor, and stopping at full hip extension without arching your lower back.
Fix those three things and you’ll feel the exercise in your glutes instead of your hamstrings or lower back every single time. From there, the progression path is straightforward — single-leg bridges when bodyweight gets easy, then weighted bridges, and eventually hip thrusts for greater range of motion and loading capacity.
Glute bridges are genuinely one of the most accessible and transferable exercises you can add to a routine. With proper form, they build real strength, improve hip extension, and help protect your lower back — all from the floor with no equipment required.